

Start your WordPress blog today with our simple, easy-to-follow guide.
So, you want to start a blog?
It’s pretty obvious, isn’t. You wouldn’t be on this page if its otherwise.
Could be you don’t know where to start. Or perhaps, you know what to do but don’t know how to do it. Or you just need a little hand holding to get going on planning, setting up, and running a blog.
Want to Grow Your Real Estate Business? Download the Complete Grant & Funding eBook for instant access to grants, guides, and more. 80+ Grant and Scholarship Opportunities (FG, State-by-State, General & Underrepresented Groups Scholarships, Plus Grant Writing Checklist). 900+ Copies Sold Already. Get Your Copy Now
You’re in the right place.
You see, I just launched a new blog; and as it turned out, I documented everything.
From brainstorming for a domain name to launching the website and everything in-between.
So, you are going to get first-hand account of what it takes to plan, execute and launch a blog regardless of the niche.
In a way, it’s like watching over my shoulder as I build the blog from the ground up.
Here’s what you’ll learn:
- BLOG DEVELOPMENT CHECKLIST
- How to Research and Select a Profitable Website Name
- What to consider when selecting a domain name registrar
- How to Choose the Best Website Host for your Blog
- How to change your domain name server to your hosting servers
- How to Install WordPress On Your New Website
- How to Configure your new WordPress site for Search Engine
- How to choose the best WordPress Theme for your blog
- How to Install a WordPress Theme On your Blog
- How to Create a Coming Soon page
- How to create Branded emails for your WordPress Site
- How to Customize your WordPress Website
- How to Setup a Google Analytics Tracking Code
- How to create a lead magnet
- How to Create your first page ( About us, contact us, Privacy, terms of us pages)
- Complete Blogging Tools I used to Launch My WordPress Blog
We hope this article will be the last you need to read to launch your blog.
Our goal is to provide you with actionable, detailed tips on everything you need to know, the resources and tools you need, and a guide to start your first blog.
However, as you will find out pretty soon, launching a new website can get quite overwhelming if you haven’t already.
So, to help you stay organized and track all the tasks that require your attention, we created a Blog Development Checklist for you.

BLOG DEVELOPMENT CHECKLIST
- The big why ✔️✔️
- Decide your unique approach ✔️✔️
- Develop a strategy for your blog ✔️✔️
- Check domain name availability ✔️✔️
- Purchase domain ✔️✔️
- Purchase hosting ✔️✔️
- Install WP ✔️✔️
- Point domain name to host server ✔️✔️
- Setup branded email ✔️✔️
- Setup coming soon page ✔️✔️
- Choose responsive theme ✔️✔️
- Install WordPress Theme ✔️✔️
- Remove unwanted features from the theme ✔️✔️
- Check your typography ✔️✔️
- Create a tagline ✔️✔️
- Install security plugin ✔️✔️
- Create a sitemap ✔️✔️
- Install a social share plugins ✔️✔️
- Install and configure SEO plugin ✔️✔️
- Install opt-ins ✔️✔️
- Create a lead magnet ✔️✔️
- Get a Google Analytics tracking code ✔️✔️
- Install Google Analytics tracking code ✔️✔️
- Change permalink structure ✔️✔️
- Edit title in your theme code ✔️✔️
- Set up About Page ✔️✔
- Set up Contact Page ✔️✔️
- Write a privacy policy/ terms of conditions ✔️✔️
- Add a quality photo of yourself ✔️✔️
- Add a logo ✔️✔️
You can download the Free checklist also. It’s a pretty, well-designed infographic you can tick as you knock off each task from your list.
[emaillocker]
[/emaillocker]
How to Research and Select a Profitable Website Name
It’s a given; you already know what you want to blog about – right?
If your answer is yes, skip the next couple of paragraphs.
Well, if you haven’t, you need to spend some time thinking about what you want to talk about.
Here’s a 3-step framework that can help you come up with a blogging niche:
What are you passionate about?
Take Action: Take a plain sheet of paper divide it into three columns. Now, write down all the things you love – do you love bead making, swimming, dogs, gardening, education – don’t leave anything out
What are your qualifications/ experiences?
Take Action: On the second column, write down all your qualifications and experience.
What do you want to achieve with the blog?
Take Action: List all the reasons why you want to start the blog.
You should have a pretty long list by now.
The next step is to select the idea that matches three of the criteria of passion, experience and why.
Now, let’s say, I love Dogs. I’m a certified dog trainer. And I want to make money selling dog products to dog owners.
What did you notice with our illustration above?
It satisfied the three criteria above of passion, experience and why.
Your turn: Go through your list until you can tick off ideas that cover these three criteria.
The final step is to find out whether there’s an audience for the idea.
To do this I’d go to Google and type – Dog lovers to guage interest in this topic.
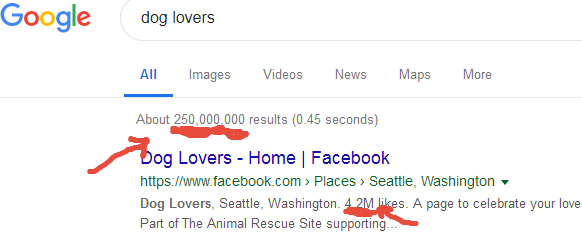
As you can see from the image above, over 250 million pages are talking about dogs. There’s even a Facebook page with 4.1 million fans – this tells me one thing, people are talking about dogs.
But, that’s not enough, I need to be sure, dog owners are interested to buy dog products off the internet.

So, I’d go back to Google and type this time – Buy Dog foods. 1.4 billion pages are talking about buying dog food online. Yes, this is a competitive niche. But, it tells me, there’s money to to be made here.
If you followed along and completed the tasks, you should have a clear niche to blog about.
It’s time to do keyword research.
The thing is, you want the domain name you finally settle for to be unique while at the same time to easily tell what the blog is about.
Listing out all the keywords you can remember is a great way to begin.
Next, is to use keyword generators like Google Keyword planner, Semrush, Keyword shitter, wordstream keyword, Ubersuggest, KWfinder to generate more ideas. Type in your root keyword into the keyword generator.
Then map each keyword with another – like combining and recombining each keyword to generate new words. You can use domain name generators at this point.
There are several free domain generators online you can use. Simply type in the keywords, and it will generate website names for you.
Once you have several domain names you like you’ll need to check for their availability.
How to check if the website name you want is available
This step is pretty straightforward. All you have to do is visit any domain name registrar – for instance, I used domainking.ng to check website name availability.
Type in the name you want in the search bar, press enter, and wait.
If the domain name is available it will show a green mark beside it and prompt you to buy it.
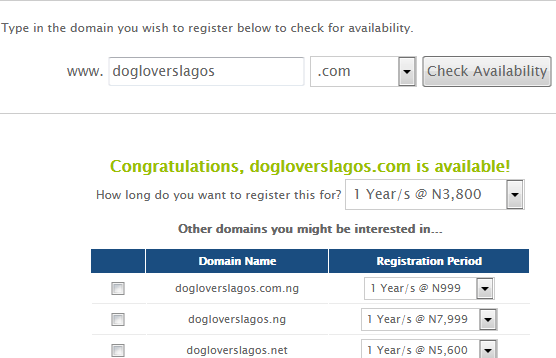
If, however, the website name has been taken, a red mark is shown, and the site will list other related available names you can go for.
To recap, here are the steps to take:
- Blog Domain Name research
- Listed out all the keywords – adjectives, nouns. I’d like to have
- Mind-mapped each word – combined and recombined words to come up with a suitable name.
- Use domain name generator for possible combinations
- Check domain name availability – used Domainking.ng
- Registered domain name on NameCheap
Personal Notes:
So, the initial domain name I really wanted smallbusinessmarketingblog.com was not available. The next best one – businessmarketingblog.com was also taken. And smartbusinessblog.com wasn’t available too.
Had to do a little bit more digging to stumble on – smartentrepreneurblog.com/us.
What to consider when selecting a domain name registrar
A domain name registrar is an organization that provides you with the platform to purchase and register a website name.
They are often accredited by ICANN, Internet Corporation for Assigned Names and Numbers, a non-governmental organization.
As you search online for a domain registrar, you will notice that many companies offer the same services.
That’s a good sign, but the problem is that there are service providers with trashy services.
How do you identify them? When registering a new website name, what are the things to look out for?
Price and Registration period
You want to save as much money as possible when setting up your blog. Most registrars price their services at $8 for the first year and $12 for subsequent years.
User experience
Apart from price, the next crucial thing to check is how satisfied current users of the services are – and complaints from previous users.
This way, you can guage how responsive the service provider is. Also, it gives you an idea of the type of challenge to expect when you purchase your domain.
Domain Expiration Policy
Some domain registrars offer a grace period to their customers after the expiration of their domain to give them time to renew.
While there are others that don’t offer any grace period. Once, the registration is expired, the domain goes offline.
So be sure to read your service provider expiration policy to know if there’s any grace period.
Add-ons/Pricing
Once you get to the checkout page for most domain registrars, you’ll notice that there are other extra services on offer.
For instance, NameCheap offers free domain privacy which protects your personal details. Also, you’d get free domain transfers and domain locks when you use NameCheap.
So, those are basically the things you should look out for when buying and registering a domain name.
Personally, I use NameCheap for all my blogs. You get an Exclusive Discount offer when you purchase your next website domain using the link below.
If perhaps, you’d rather use a Nigerian registrar use smartweb. My personal blog: samsteve.com, has been hosted with them for the past three years, and I haven’t had any issues with them.
Use this link to register your domain name on smartweb.
How to Choose the Best Website Host for your Blog
If your domain name is the address to your online house; the server or in this case, host is the actual building.
And just as you were careful to select a domain name provider that’s reliable you also need to house your website on a stable, reliable, and fast server.
Fact is, 70 percent of your online success lies on how fast, reliable, and accessible your host is. So, choosing a website host shouldn’t be an afterthought.
Thankfully, there are signals you can lookout for to determine whether a host provider is suitable for your needs.
Let’s take a look at some of them.
Speed
A slow website will cost you both money and traffic. Google rewards fast websites. Your audience loves sites that loads fast.
Hence, it is non-negotiable, your website host provider must guarantee at least above average speed.
Up-Time
You don’t want to wake up one morning and realize your website is down.
Customer Reviews
Don’t ever buy any hosting until you have read several customer reviews. Focus mostly on the 3-star ratings, it gives you an idea of the possible challenges you’re likely to face when you finally purchase yours.
Also, pay close attention to the comments about customer service. Is the service provider reachable? How fast do they respond to and resolve issues? Are they open 24/7 or do they have specific office open hours?
Price
Truth is, you get what you paid for. If you need a responsive, reliable, fast website host, you have to pay more.
However, it doesn’t mean that you can’t get decent host for any price point.
Personally, I’d recommend you buy SiteGround beginner plan as it offers you everything you need to launch your first website.
When you purchase using this link you get an Exclusive Discount from SiteGround.
In the spirit of full transparency, I get a small commission when you use the link above to buy your next hosting.
Personal Note:
Paid for the hosting this morning from SiteGround. – The Startup plan $47.80 or equivalent of 17, 301 naira.
That’s almost double of what Nigerian hosting companies charge.
I have my reasons though, I’ve used Whogohost for almost 3 years now. It was a nightmare.
So, to avoid stories that touch had to port to foreign hosts.
For this project, reliability is essential. I don’t want to wake one morning and see the website down.
Another deciding factor for me was Speed.
Siteground has some of the fastest servers around. And with servers in three continents, I can rest easy knowing that regardless of where someone is visiting the site from, the speed will be above average.
However, if you are just starting and can’t afford to pay NGN17, 301 yet, you can still go with any of the Nigerian host. Keep in mind though, you’ll have to migrate as soon as your site starts growing.
How to change your domain name server to your hosting servers
Here’s a video tutorial that walks you through the steps to point your domain nameserver to your hosting servers.
If however, you’d like text, then read on:
By now, you should have your domain name registered. And also a hosting platform ready.
The next step is to point the nameservers for the domain name to the hosting servers.
Without doing this, your website wouldn’t show when someone types in your domain name.
ACTION TIP: Try this now, click www.yourdomainname.com you’ll see it doesn’t open to any website.
But, once you link both domain name and hosting servers, it will start showing.
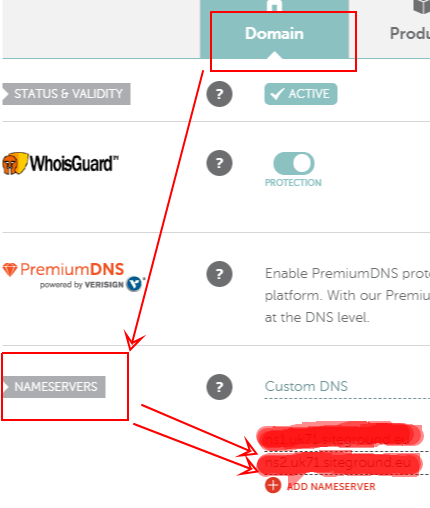
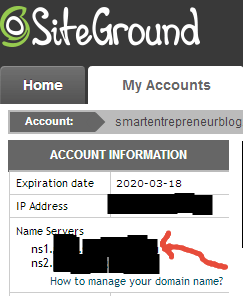
The First step is to login to your dashboard for the domain name.
Beside the details of your website name you’ll see a manage tab. For this tutorial, we used NameCheap, your domain name provider dashboard might be a bit different.

Click on it.
A new page with details of your blog opens.
Search for domains – you’ll see two nameservers. copy the nameservers.
Login into your cpanel provided by your hosting company.
Scroll down to domains.
Click on it. You’ll see two nameservers listed there.
Replace the first nameserver n1 with the corresponding nameserve you copied earlier.
Copy the second nameserver from your domain host.
Replace second nameserver n2 with the corresponding nameserver.
Click save. That’s all. Wait for 24 hours for the changes to propagate properly.
How to Install WordPress On Your New Website
For this tutorial, I’m going to walk you through how to install WordPress on Siteground.
So, let’s go…
One cool thing about Siteground is that there are several options you can use to install the WordPress content management system on the platform.
Each method is suitable for different tech skills. If you’re non-techy and would like to install your CMS yourself, there’s an option for you.
And thankfully, these options are simple, straightforward, and easy to follow.
You can either follow the Siteground WordPress installation wizard or use the Softaculous installation software to get your blog up and running.
How to install WordPress using the Siteground WP Installation Wizard
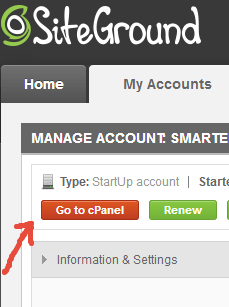
Sign into your new Siteground account.
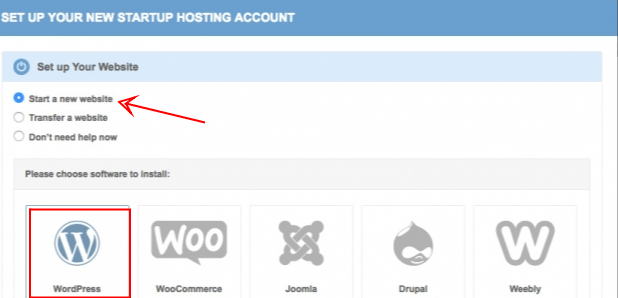
A pop up shows up asking you if you want to set up a new website. Select set up new website
Select WordPress
A new page opens. Fill in the form field to create your login details to your WordPress dashboard.
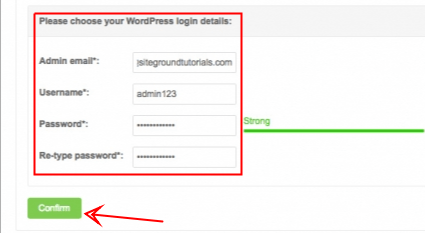
Click confirm.
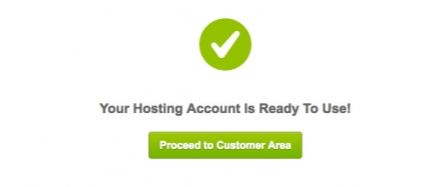
On the next page, you’ll be prompted to select some enhancements you’d like to your account. Leave it for now and click complete setup.
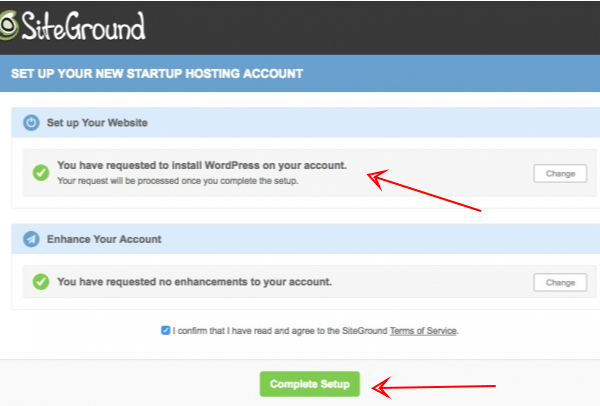
That’s it. Your WordPress account is now ready. You can log in now into your dashboard with the details you filled in earlier.
How to install WordPress on Siteground using Softaculous Installer
Log into your Siteground control panel (Cpanel)
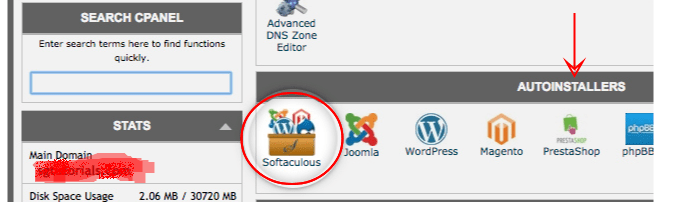
Under the AutoInstaller find the Softaculous installer – Click on it.
On the new page that opens, select WordPress.
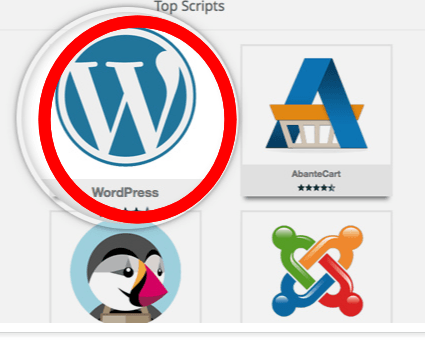
On the new page, click on install.
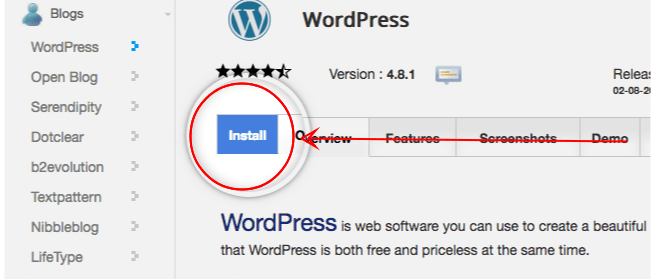
Then, fill in the required fields for your new website.
Once, you have completed the form, Click Install.

Softaculous will install WordPress automatically.
A congratulations message will popup to show you’ve successfully installed WordPress.
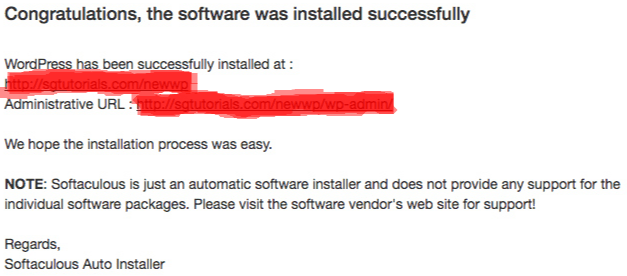
You can now follow the administrative link to log into your WordPress dashboard.
How to Configure your new WordPress site for Search Engine
So far, you’ve installed and linked your domain name to your host. It’s time to do couple of tinkering so search engines like Google, Bing, Yahoo, Yandex and so on can see, crawl and index your website.
The thing is, search engines are reliable sources of traffic for blogs. They are relatively cheaper than PPC and paid ads; and when done right, have long term effect on the growth of your website.
In this section, you’ll learn about the basic SEO tasks for a new WordPress sites.
Make your Website Visible to Search Engines
Well, the first place to start with optimizing your new blog for search engines is to make the site visible to the SE.
To do that, log into your WP dashboard.
Scroll down to the settings
Click on Reading

Make sure Search Engine Visibility unchecked.
Use SEO Friendly URL structure
Once you are sure your site can be discovered by search engines, the next is to set an seo-friendly permalink structure for all your posts and pages
To do that, on your WP dashboard
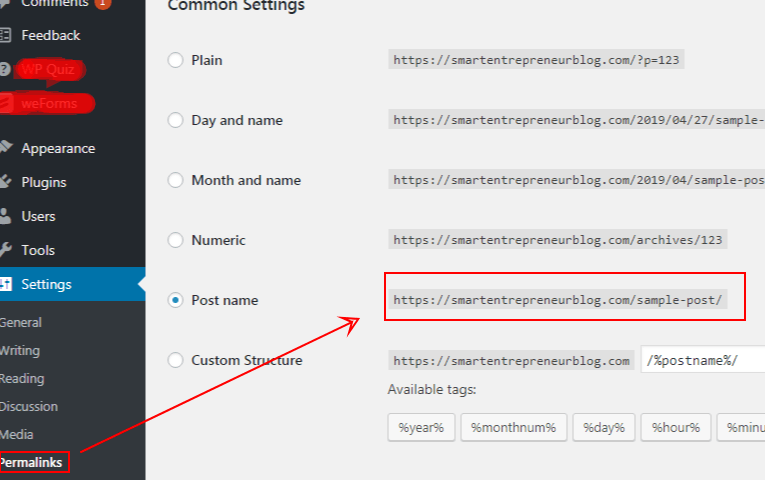
Scroll to Settings >> then Permalink
Select Post name and save changes.
Set a preferred URL (www vs non-www)
Decide whether you want your primary site url to be https://www.yourdomain.com or https://yourdomain.com
The thing is, Google sees each of the url as a different site, so choose one and stick with it.
To change your preferred url on your WP dashboard
Scroll down to Settings >> then General
Type your preferred URL on the Site Address
Type the same URL on the WordPress Address
Save changes.
How to choose the best WordPress Theme for your blog
Now, you’re set to start beautifying your website. Think of the WordPress theme as the paintings, finishing, and fine-detailings after building a house.
It’s literally what someone will see when they land on your blog. It manages how the valuable content you’ll share on your website will be presented.
The template is the frills and whistles of your blog. A visitor to your site can decide to stay or leave within seconds just by the feel and look of your website.
So, you see why it’s essential to choose a theme that meets your requirements while at the same ensuring users have great experience navigating through your blog.
Here are the features to look for in a theme:
Fast, lightweight theme –
Speed is essential. The faster your blog’s load time is the higher Google ranks you on their search results; and the more time people spend on your site.
Minimalist templates with clean design are great. You want a theme that gives the options to turn off features.
Responsive SEO-optimized theme –
Organic traffic from search engine is the lifeblood of successful websites. To increase your odds of ranking higher, you have to implement seo-optimised template for your blog.
Also, with the trend that more people surf the net on their mobile phones, means you can’t afford to ignore the traffic from mobile. Hence, you also have to ensure the template you choose is responsive and able to render well for different screen sizes.
Has capability to handle ads –
If you intend to monetise your blog through ads then you must make sure, the theme is capable of handling ad widgets to display the ads.
Customizable –
Thankfully, most WordPress themes on the market today has a dashboard from which you can customize them.
On the theme customization board you can change your site’s color, select and or import fonts, and make changes to other brand-able elements.
After Sale Service and Support –
Before purchasing a template read through customer reviews to see if the developers are responsive to their customers.
You want to buy from a developer who would be there to resolve any issues you may have without delay.
Personal Note:
I’m currently looking at POINT Theme – I’ve used the free version on another site. Though, it is selling for $34 on themeforest.
Still searching for more themes though. Will update you before the end of today on what I decides to go for.
Deciding on a theme for the project, took longer than I had anticipated. Though, I’ve finally drilled it down to three.
POINT theme is out of it for now. MH Newsdesk, ColorMag, and MH magazine lite are the three templates.
So, I’ll have to upload them to my WP -WordPress – tweak and see how they perform before finally settling down on one.
Unfortunately, it’s very likely I wouldn’t be using any of the templates. The free versions are severely limited. And, I couldn’t customize the footer. That was a sticky point for me.
So, back to searching for a template that feels right and has the right features. Finally, settled for Point Theme.
How to Install a WordPress Theme On your Blog
Once you’ve decided on a template, the next step is to install it.
Now depending on whether you bought the theme off a WordPress marketplace like themeforest and thrivetheme or you selected one from your WP dashboard, the process of installation will be slightly different.
Keep in mind though, that each of the process is quite straightforward.
So, here are the steps you need to take:
When you have a template saved on your computer:
- Login into your WordPress Dashboard.
- On the navigation panel, scroll down to Appearance
- Click on Themes
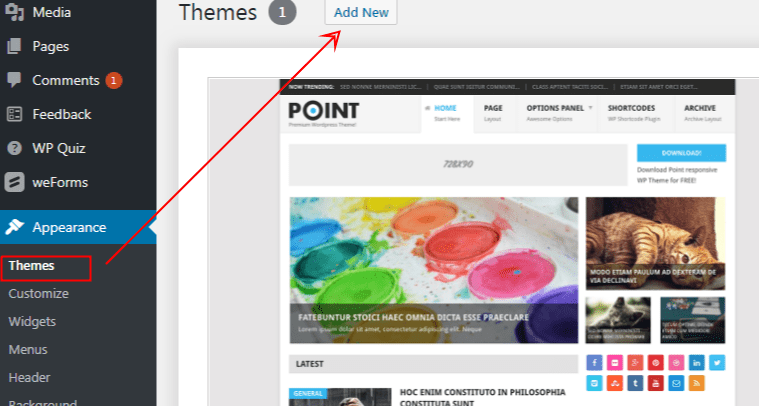
- At the top right hand side of the new page, you’ll see Add New
- Click on Add New
- On the next page, click Upload theme
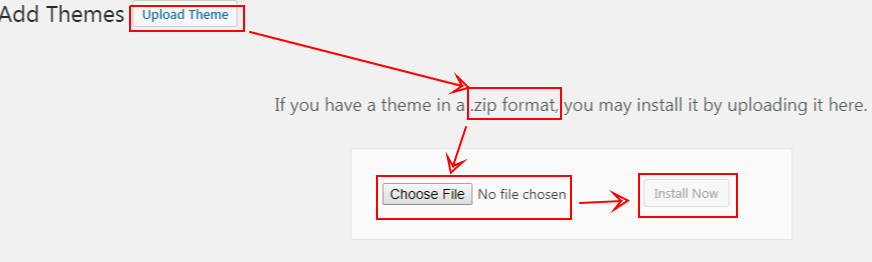
- Then, follow the dialog box to select the theme from your computer
- Ensure though the file is a zip file
- Click upload. Then Click Install. Wait for WP to install your new theme
When you want to choose a template from the WP theme Library
- On the Add New page, scroll down to see some of the available themes
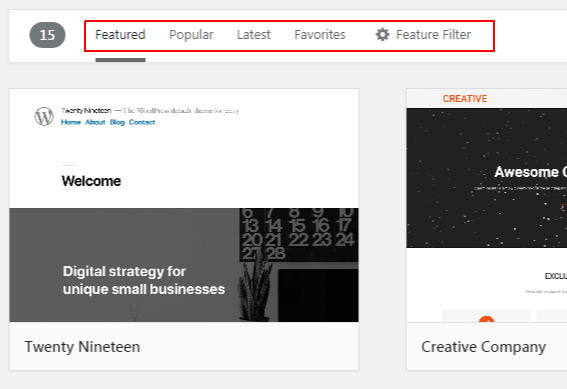
- Use the Popular, Trending, New tabs to drill down to the a particular theme
- Or, use the feature settings to display only themes that have certain features.
- Once, you see anyone you like, click on it to install. That’s all.
If you followed these steps you should have your template installed now.
How to Create a Coming Soon page
Now, we’re getting closer and closer to setting up the website nice and pretty.
If you remember, the last time I asked you to visit the blog – it was bland. Not pretty. And boring.
But, what do you do when you’re not yet ready to launch?
That’s where a COMING SOON page comes in.
The page is like a placeholder which tells visitors to your site you’re currently working on it and would be launching soon.
The page can also serve another purpose – serve as a landing page to start collecting emails.
You can start building your email list right away.
That said, there are number of ways to set up a coming soon page:
You can create a custom page or use special WordPress plugin to create one in minutes.
Check the website right now: http://smartentrepreneurblog.com/us
I used nifty coming soon plugin to create it. It’s a free tool.
To install the Nifty coming soon plugin.
- On your WP dashboard, click on Plugins
- Click on Add New
- Use the WordPress Search Bar to search for Nifty
- Install and Activate it.
Before selecting the plugin, one essential feature I was looking for was the ability to collect emails. With nifty, I was able to do so and to do it without paying.
So, once I installed and tweaked the plugin a bit, I set up a form to start collecting emails.
Nifty will prompt you to install weForms plugin- you will use this to create the sign up on your page. Follow the same steps to install weForm plugin.
Once, you’ve installed and activated it. Click on weforms to configure your new optin form.
Check out the pre-installed templates to select one that meets your needs.
You can actually build one for yourself. To do that click on the blank template; then drag and drop any of the fields you want your form to have.
Personally, I used the blank form since my goal was to collect only names and emails.
Check the video to see how its done.
The next step is to integrate the form with a database to collect the emails. Click the integration tab on the weForm.
How to set up Slack to collect emails for your Coming Soon Page
I used Slack. It’s also quick to setup.
- Quickly visit slack.com.
- Click on sign in then below the form field click on create new work space.
- Follow the instructions and you’re set.
- Once, the work space is created, a unique link will be generated – that’s the web hook
- Copy the link. Then go back to your WP, and paste it on the space for Slack
- Click Activate and you’re set.
From now on, anybody that visits your coming soon page and fills the form will be added to your slack workspace. You can export the contacts later.
How to create Branded emails for your WordPress Site
One of the coolest things about having a custom website is that you also get to have a branded email.
For instance, sam@smartentrepreneurblog.com/us is a branded personalized email I created for this blog.
There are several benefits to having this kind of email:
One I can think right off the bat is, it projects you as a professional. There are other benefits of course.
So, how do you create one?
- Login into your host C-panel
- Scroll down until you see Mail
- Under this tab, you’d see Email Accounts, Email, Auto-responders etc.
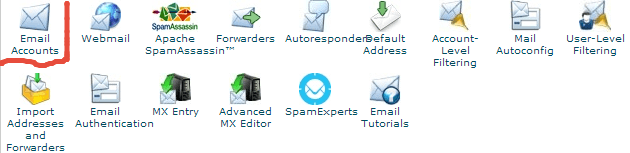
- Click on Email Accounts.
- On the new page. Fill in the blank space.
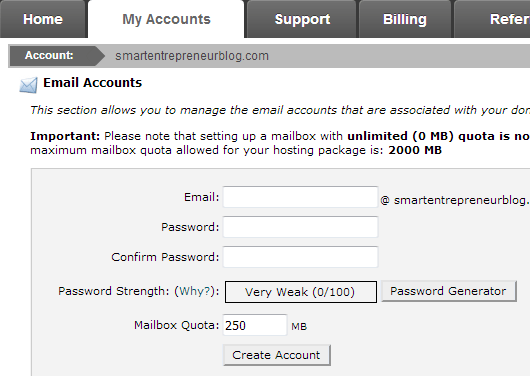
- Once, you are done. Click Create New email
That’s all. You’ve just created a new email account.
You can set memory space for the email account here. Change passwords. Delete accounts.
How to Customize your WordPress Website
WordPress is an incredibly flexible content management system. You can tweak the font colors, change fonts, add a logo, and even make site-wide changes to the color theme.
It’s possible to create or add new items to widget areas. You can create, edit and delete menus. You can even specify where you want your menu to appear – on the header or footer.
Also, you can personalise the header and footer of the site. WordPress gives you the power to truly brand your website.
So, how do you make the changes to your new site?
Step 1: On your WP dashboard, to go Appearance. Click on Customize ( Appearance >> Customize)
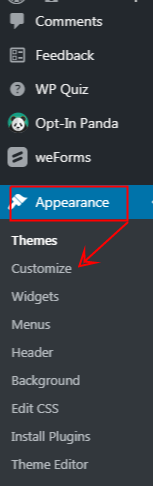
Step 2: Personalize each of the element on your website: Site Identity, Colors, Headers, background Images, Widgets, Menus, etc.
Please note that the theme customization interface might be different for other templates; though the features are the same.
Step 3: Customize Site Identity – Here’s where you change the Site Title, tagline and site icon.
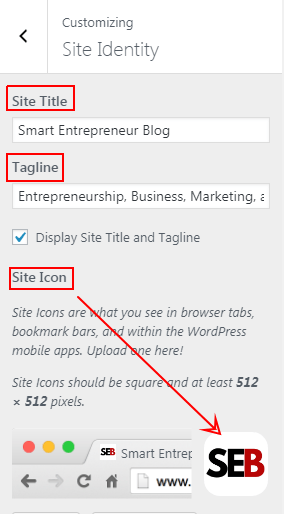
Step 4: Customize site header – here’s where you change or add site logo.
Step 5: Change site background image
Continue until you’ve customized each of the element to your preference. Most templates have a live preview where you can see in real time all the changes you made.
Once you’re satisfied with the look and feel of the theme, click Publish or Save Draft if you intend to make some more changes before finally going live.
How to Setup a Google Analytics Tracking Code
The website is taking shape. All that’s remaining at this point is to start writing and publishing content.
However, you would as I suspect want to track the performance of your content when you start publishing them.
Also, I’m guessing you will want to know the number of hits your site is getting in a month. The number of unique visits on your site, which pages they visit.
How long they spend on your site, what search terms they used to land on your site, and probably which site they were on before visiting yours.
To get these data, you need to set up an analytics tracking codes on your site. Our preferred analytics tracker is the Google Analytics (GA).
We chose GA because; it is free; robust, has a neat interface, and has all the features we’d need for smartentrepreneurblog.com/us
In this section you will learn how to generate a GA code and how to install the Google analytics code on your site.
How to Generate a Google Analytics Tracking Code
The process is quite straightforward at least, to those who know what they are doing.
What you need?
A Google account. The thing is , you need a Google account to access all of Google’s products and services.
So, create a Gmail account if you haven’t.
Once, you have your Gmail setup, the next is to visit: analytics.Google.com
Sign in with your Gmail account
On the new page, look at the left hand side and click Signup to begin the process to setup your GA account.
On the next page, fill in all the form field,
Then, click the Get tracking code.
A new page with your tracking code will open. You’ll see the code boldly displayed
It begins with UA-xxxxx-xxx. That’s your tracking code. There’s also a snippet of code below which you’ll need to complete the setup.
The next step will be to copy and paste it into your Theme header.
How to Install Google Analytics Tracking Code on your WordPress header file
To add the tracking code to your WordPress here are the steps to follow.
First, you need to access your theme’s header.php file. A simple way to do that would be going through your WP dashboard.
Step 1: scroll down to Appearance tab on your dashboard
Step2: Click on the Theme Editor tab
Step 3: On the code editor, search the left hand side menu till you see header.php
Step 4: Click on the file.
Step 5: Paste the code above the closing head tag </head>
Step 6: Click Update file to save the changes.
How to create a lead magnet
Lead magnets are resources – could be PDF, ebooks, vidoe, audio anything at all – you give to your audience in exchange for their contacts, often emails.
I made a terrible mistake with my first blog – it took mr almost two years to install my first optin form to collect emails.
Don’t want to make the same mistake again.
So, somehow I have to figure out a way to create a lead magnet to start builidng out my list.
Here are some of the processes, I followed:
- Decide what the lead magnet would be
- Gather the necessary content
- Package the content
- Hide it behind a sign up form
What kind of lead magnet do you want to create?
Is it an audio content, video or perhaps an ebook?
For me, it was pretty straightforward. Since, I was already documenting all the processes I followed in creating and setting up the blog, all I had to do was to package those content and use them as a lead magnet.
Once, you decide on the type of content to give away, the next step is to design it.
Develop the content
If your lead magnet is an ebook – it’s time to write it. Record your video or audio.
What if you don’t have the time or know how to create your lead magnet?
No problem.
You can outsource the creation to a freelancer. You can hire a freelancer on websites like Fiverr at a relatively cheap rate to work on your idea.
Another option is to buy PLR (Private Label Right) products, edit and put your name on it.
Private Label rights are products – ebooks, videos, courses you buy and then rebrand as your own. You can sell them or give them away as tripwire ( another term for lead magnets).
Be sure though, to use only high quality PLR products, and as much as you can edit the product before using.
The third option to develop a lead magnet is to document your process, record the backscene of your workflow, package it and use as a tripwire.
That’s exactly what I did here. I documented all the things I did to set up the blog, recorded video as I implemented them and packaged them as a lead magnet.
The checklist above, remember, I’ve even turned it into a nifty, handy infographic. Download it here.
[emaillocker]
[/emaillocker]
So, you see, there are several options available to create a lead magnet to start collecting emails as soon as possible.
Package the Content
Now, you have the content ready, it’s time to put everything together into a nice, beautiful, well designed format.
For instance, the checklist above was repurposed into an infographic. This blog post is also in a PDF format. And there’s the video, so regardless of how you like to consume content, you’ll find a format suitable for you.
Canva is a handy free tool for creating infographics and ebook covers. The videos were recorded with CamStudio – there’s a free version. And you can turn your ebook into PDF by saving as PDF in word.
Hide the content behind opt-ins
Remember, the goal was to ask your audience for their emails. Locking the content behind an optin form does just that.
Before anyone can access or download the file, they would have to give you their email.
You can use many WordPress plugins for this – some are free with limited features, and others are premium.
It’s quite simple to set up an optin form.
To install an optin form do the following:
- First, on your WordPress dashboard.
- Hover your cursor around the Plugins tab
- Click on add new
- On the new page type in “opt-in forms” on the search bar
- Go through the results until you see a plugin you like
- Install and activate.
- Then follow the instructions to create and set up your first opt-in form.
How to Create your first page ( About us, contact us, Privacy, terms of us pages)
Once you have set up your WordPress, Installed a template, and configured your site for SEO, it’s time to start creating the essential pages for your blog.
Here’s a simple, step-by-step guide to creating your first page on the modern Gutenberg WordPress editor.
On your WordPress dashboard, scroll to the pages tab.
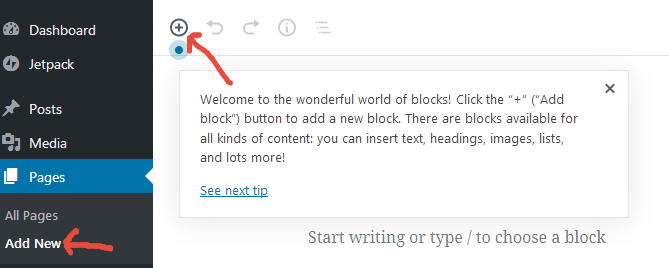
Click Add New
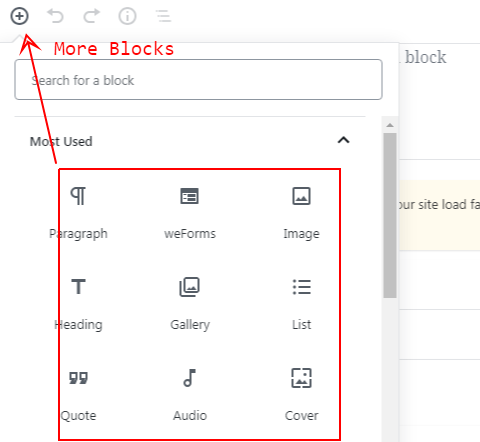
Add New Elements – use the blocks to build your page
Publish or Save Draft
How to create your first post on WordPress
Finally, after all the hard work, you are ready to publish your first post.
To write your first post, follow these steps:
Note, though, it’s almost the same as creating a page.
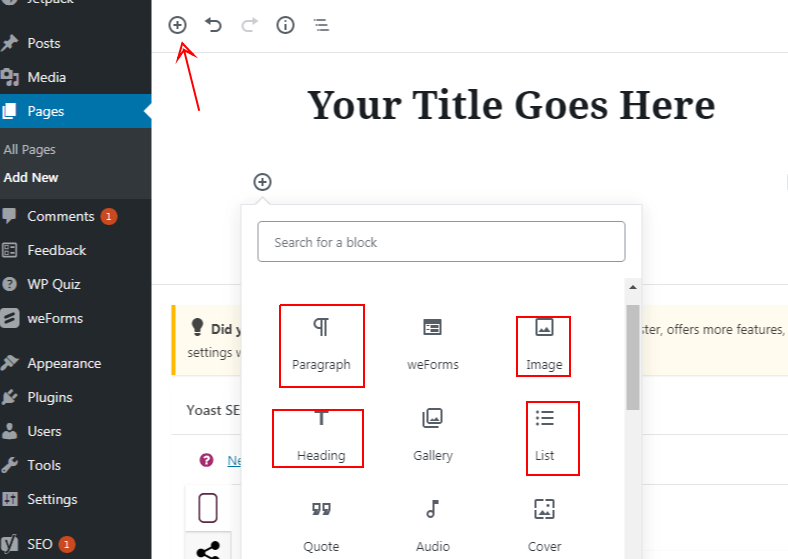
Click on Post Tab
Click On Add New
Use the BLOCKS to add any element you’d want.
Complete Blogging Tools I used to Launch My WordPress Blog
To conclude this post, I will list all the tools and resources I used to launch my WordPress blog.
Google Docs – to ideate and plan
Trello – used it to visually manage all the processes
Canva – To create the infographics
Siteground – Hosting provider
NameCheap – Domain name host
MailChimp – Email sign ups
Opt-in-Panda – Plugin to design signup form
Nifty Coming Soon Plugin – to create coming soon page
Slack – collect pre-launched sign ups
WeForms – To create contant form
WP Quiz – Create quizz
RankMaths -For SEO
Akismet – For Security
JetPack – For social shares
Google Analytics -Track site visits
Freepiks – For high quality images
CamStudio – For screen recording
YouTube – To host videos
You Also Like: The Top 15 Small Business Challenges and How to Resolve Them

Wrapping up…
You have what’s unarguably the most comprehensive, detailed manual on the internet to start your WordPress blog.
Now, go out and create your dream online business. And if you have any questions drop your questions in the comment section, and I’ll answer every one of them.
Do you want to keep the post as a keepsake for reference purposes, like downloading it so you can always come back to it?
Enter your best Email and Name below to Download the A-Z Guide to Start Your WordPress Blog In 24 Hours.
Hand-Picked For You:
- FAQs: How to Start a Business In 2022
- FAQs: How to Grow Your Business In 2022
- FAQs: How to Fund Your Business In 2022